

How to Block Internal/Logged-In Traffic From Google Analytics Using Google Tag Manager (Without Using a Plugin)

Envision Marketing • August 7, 2023

Share this article

When you’re running a website – especially a smaller one – every user counts. It’s essential that the data you collect on user behavior is accurate. One of the issues that site owners often overlook is their own impact on this data. Every time you, your developer, or other team members visit your site, you’re potentially skewing the data collected by tools like Google Analytics. This is particularly significant for sites with modest traffic.


A common solution is to block tracking for logged-in users, as these are often site administrators, editors, or developers. Surprisingly, a lot of the guidance online for achieving this is provided by plugin developers. While their insights can be useful, they often have an ulterior motive: getting you to use their plugin. This means their instructions might either be unnecessarily complicated or oriented towards promoting their products.


In this article, we will explore the two easiest methods for blocking Google Tag Manager (GTM) tags for logged-in WordPress users without using a plugin!


Method 1: If WP-Admin Bar is Present


For most WordPress sites, you can determine a user’s logged-in status based on the presence of the WordPress admin bar using pure JavaScript within Google Tag Manager (GTM). This can be a more straightforward approach if you’re trying to avoid dealing with PHP and theme modifications.


Here’s a step-by-step guide:


1. Create a New Custom JavaScript Variable in GTM:


  1. Login to Google Tag Manager and navigate to your container.
  2. Click on “Variables” in the left sidebar.
  3. Click on the “New” button to create a new variable.
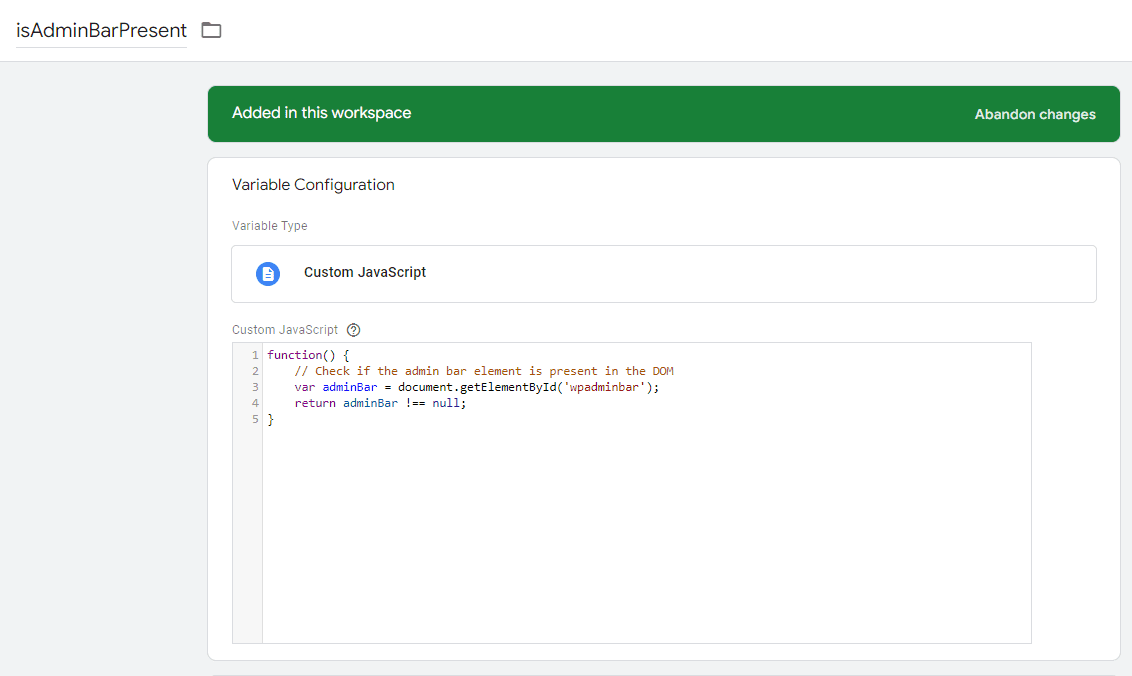
  4. Name the variable: Set the name to something like isAdminBarPresent .
  5. Choose Variable Type:
  • Click on “Variable Configuration”.
  • Choose “Custom JavaScript” from the list.
  1. Enter the Custom JavaScript:
  • In the code area, enter the following JavaScript:

function() {

  // Check if the admin bar element is present in the DOM

  var adminBar = document.getElementById('wpadminbar');

  return adminBar !== null;

}

This function checks for the presence of the WordPress admin bar by looking for an element with the ID wpadminbar in the DOM. If the admin bar is present, it returns true ; otherwise, it returns false .


  1. Save the variable. It should look something like this:
Green-topped webpage showing a content editor with a text/code box and sidebar navigation

2. Utilizing the isAdminBarPresent Variable in GTM:


You can now use this variable as a condition in your GTM triggers.


For example, if you want to prevent a GA4 event from firing when the admin bar is present (indicating a user is logged in):


  1. Navigate to “Tags” and select (or create) the tag you’d like to control.
  2. In the “Triggering” section of the tag, create a new trigger or modify an existing one.
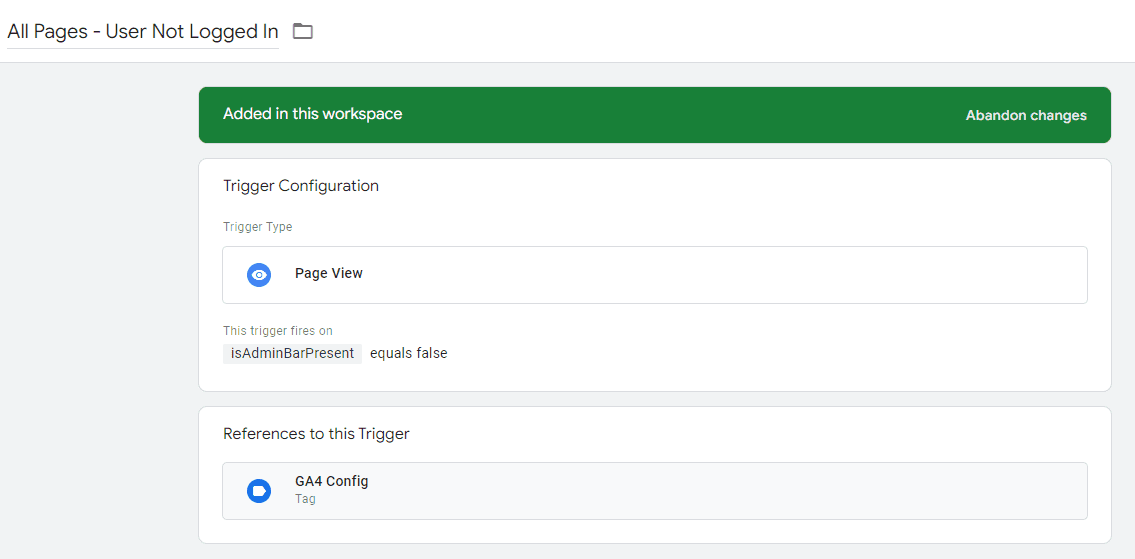
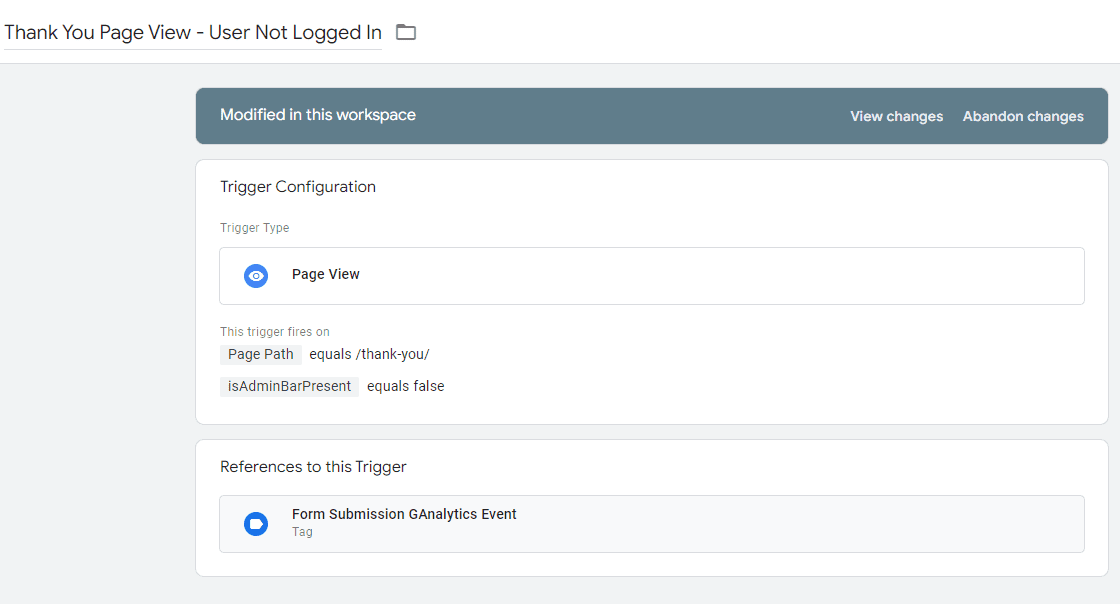
  3. Configure the trigger such that it fires only when the isAdminBarPresent variable is false .

Here’s an example showing how your page view GA4 event trigger might look after this implementation:

Green-topped web form showing uploaded files and selection options in a white panel.

Here’s an example showing how your form submission GA4 event trigger might look after this implementation:

Screenshot of a web form with a blue header and two white content cards on a light gray page

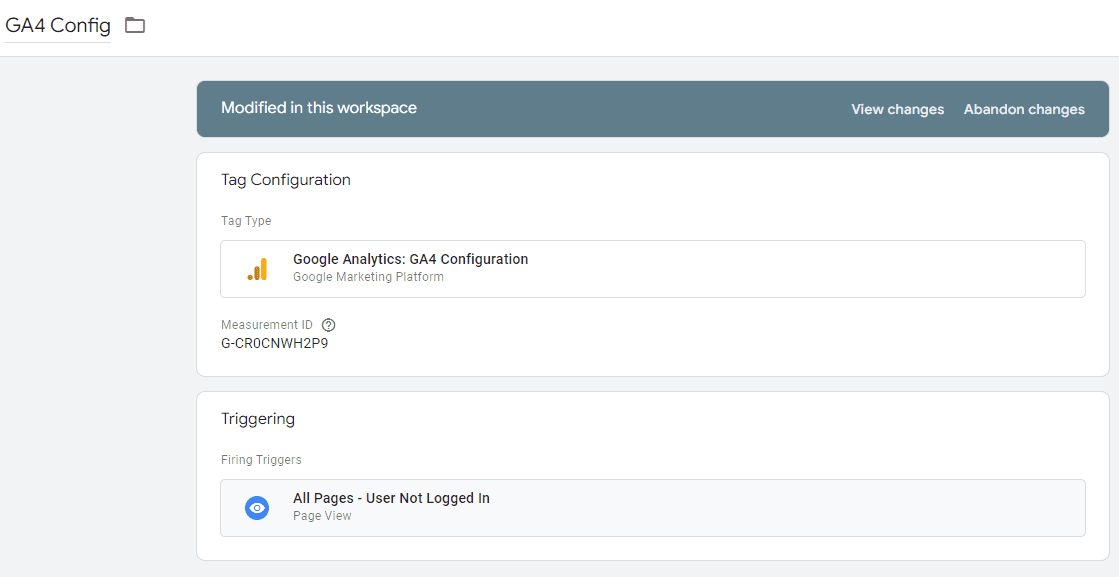
Here’s an example showing how your GA4 Configure tag might look after this implementation:

Software dashboard page showing sections for support tickets and payroll items on a white interface.

This method uses client-side checks and avoids any server-side code, making it simpler to implement directly within GTM. However, always ensure to test thoroughly to make sure it works reliably across different pages and user states.


Method 2: Pushing Logged-In Status to the Data Layer


This method involves using WordPress’ built-in functions to check if a user is logged in and then pushing this information to Google Tag Manager’s data layer. This allows for more flexibility, letting you pick and choose which tags to block based on the user’s logged-in status.


Steps:


1. Add a PHP Script to Your Theme or Child Theme:


  1. Navigate to your WordPress theme’s functions.php file. If you’re using a child theme (recommended), add it there.
  2. Add the following code:

function push_user_status_to_datalayer() {

    $user_status = is_user_logged_in() ? 'logged_in' : 'logged_out';

    // Escaping the JavaScript string

    $user_status = esc_js( $user_status );    echo "<script>

        window.dataLayer = window.dataLayer    [];

        window.dataLayer.push({

            'event': 'user_status_event',

            'userStatus': '$user_status'

        });

    </script>";

}

add_action('wp_head', 'push_user_status_to_datalayer');

This code will push an event to the data layer every time a page is loaded, indicating the user’s status (logged in or logged out).


2. Utilizing the Data Layer Variable in GTM:


  1. In GTM, navigate to “Variables”.
  2. Create a new variable named “userStatus”.
  3. For variable type, select “Data Layer Variable”.
  4. Set the Data Layer Variable Name to “userStatus”.
  5. Save the variable.
  6. Now, when setting up triggers for your tags, you can use this variable to conditionally fire tags.
  7. For instance, if you want to block a tag for logged-in users:
  8. Navigate to “Tags” and select (or create) the tag you want to control.
  9. In the “Triggering” section, create a new trigger or modify an existing one.
  10. Set it to fire only when the userStatus variable does not equal logged_in .


Debug Mode Consideration:


  • When you’re testing and debugging, you might not want to block any tags, even for logged-in users.
  • To ensure tags aren’t blocked in debug mode, you can add an additional condition in your trigger. GTM automatically sets a gtm_debug variable when in debug mode.
  • Adjust your trigger conditions to also check if gtm_debug is not true. This will override the user status condition, ensuring tags fire while debugging.

This method gives developers more control over which tags to block based on the logged-in status. With the addition of the debug mode check, you can smoothly transition between debugging and regular tracking, ensuring that no data is missed during testing and that no internal data skews your results during regular operation.


Method 3: Setting and Checking a Cookie Based on Data Layer Information


Using cookies to store and subsequently check a user’s logged-in status offers the benefit of persisting the information across sessions. This can be handy when you want to have a historical record of the user’s last known status without repeatedly querying the server. Here’s how to set it up:


1. Follow Step #1 of Method #2: Add a PHP Script to Your Theme or Child Theme:


  1. Navigate to your WordPress theme’s functions.php file. If you’re using a child theme (recommended), add it there.
  2. Add the following code:

function push_user_status_to_datalayer() {

    $user_status = is_user_logged_in() ? 'logged_in' : 'logged_out';

    // Escaping the JavaScript string

    $user_status = esc_js( $user_status );    echo "<script>

        window.dataLayer = window.dataLayer    [];

        window.dataLayer.push({

            'event': 'user_status_event',

            'userStatus': '$user_status'

        });

    </script>";

}

add_action('wp_head', 'push_user_status_to_datalayer');

This code will push an event to the data layer every time a page is loaded, indicating the user’s status (logged in or logged out).


2. Setting a Cookie in GTM When User Logs In:


  1. In GTM, create a new custom HTML tag.
  2. Name the tag something descriptive like “Set Logged-In Cookie”.
  3. Enter the following custom HTML code

<script>

(function() {

  if ({{userStatus}} === 'logged_in') {

  var d = new Date();

  d.setTime(d.getTime() + (365*24*60*60*1000)); // set for 1 year

  var expires = "expires="+ d.toUTCString();

  document.cookie = "userStatus=logged_in; " + expires + "; path=/";

  }

})();

</script>

  1. For the triggering condition, use the previously defined user_status_event as the event that activates this tag.


3. Creating a GTM Variable to Read the Cookie:


  1. In GTM, navigate to “Variables” and create a new variable.
  2. Name it something like “Cookie – User Status”.
  3. For the variable type, select “1st Party Cookie”.
  4. Set the cookie name to “userStatus”.


4. Setting Up a Trigger Condition Based on the Cookie:


  1. Navigate to “Triggers” in GTM.
  2. Create a new trigger named something like “User is Logged-In (via Cookie)”.
  3. Choose “Page View” as the event.
  4. Set the triggering condition to fire when the “Cookie – User Status” variable equals logged_in .


5. Blocking Specific Tags for Logged-In Users:


  1. Navigate to “Tags” and select (or create) the tag you want to control.
  2. In the “Triggering” section, either modify an existing trigger or add a new exception trigger.
  3. For the exception condition, choose the “User is Logged-In (via Cookie)” trigger you created in the previous step.


Debug Mode Consideration:


  • As with the previous methods, you should account for GTM’s debug mode. This ensures that while you’re testing and debugging, tags won’t be blocked even for logged-in users.
  • Adjust your tag’s trigger conditions to also check if gtm_debug is not true, which will ensure tags fire while in debug mode but not during regular site visits by logged-in users.

This method uses cookies, allowing you to store the logged-in status for an extended period and efficiently block or allow tags based on that persistent status. By integrating this method with GTM and the Data Layer, you can have a versatile, robust, and efficient system for controlling which tags fire for different user states. As always, make sure to test thoroughly to ensure that all components work seamlessly.

Recent Posts

White chalk-style word “BUSINESS” on a black background.
By Envision Marketing July 31, 2026
A comprehensive 2026 guide to choosing the right digital growth agency, understanding data-driven strategy, evaluating white label digital marketing services, and setting realistic expectations for results.

Red Reddit logo with white smiling mascot on orange background
By Envision Marketing August 20, 2024
Learn effective Reddit marketing strategies for small businesses. Contact us for tailored digital marketing solutions today!

Wooden blocks spelling “WEBSITE” on a table with a blurred green plant background.
By Envision Marketing July 26, 2024
Explore top website builders like Shopify & Wix for small businesses. Get tailored solutions to enhance your online presence today!

Office desk with computer monitor showing charts and graphs, surrounded by analytics screens and a desk lamp
By Envision Marketing July 23, 2024
Learn to measure your SEO campaign's success beyond keyword rankings. Focus on Google Search Console & drive sales conversions.

Businessperson holding a tablet with SEO, AI, and gear icons on a dark digital background
By Envision Marketing July 31, 2023
Learn how AI is reshaping SEO strategies. Contact us to enhance your digital marketing approach today!

Person using a laptop displaying the ChatGPT logo on a green screen in a green-lit room
By Envision Marketing May 22, 2023
Explore top ChatGPT plugins to boost local service businesses. Enhance customer service & marketing. Contact us for tailored solutions!

Notebook with colorful SEO-related words and pencils beside a computer keyboard
By Envision Marketing May 20, 2023
Simplify SEO reporting with our Google Search Console tool. Save time & gain insights tailored for local businesses. Start optimizing today!

Tablet displaying business charts on a wooden table beside a white coffee cup
By Envision Marketing May 16, 2023
Maximize your website's effectiveness with proven strategies. Contact us for a custom plan to boost conversions today!
Tablet displaying a web dashboard with charts on a desk
By Envision Marketing May 15, 2023
Learn how AI & SEO are evolving for local service businesses. Contact us to create a tailored marketing strategy!

OpenAI logo on a black screen against a blue background
By Envision Marketing May 8, 2023
Get the latest updates on AI & digital marketing for local service businesses. Stay informed with key insights and strategies.

Show More